While it can easily be argued that there is no “one size fits all” video streaming service for every virtual event, Zoom is so versatile that is just may satisfy 100% of the K-12 education needs. Hence its great popularity and efficacy for either one-on-one tutoring, or classroom-style content delivery. So how do you get started? If this is your first jump into Zoom, start here at the top. If you have already mastered Zoom basics, skip down to the title, “What Else Can I Do With Zoom?” Zoom for education is pretty easy to use, and it’s a great fit!
Zoom for education is pretty easy to use, and it’s a great fit!
First things first — There are two primary ways people view Zoom: On a mobile device, and on a desktop computer. You will want to set up and convey your content from a desktop computer. Why? Because the menu options in the mobile Zoom app are limited. Sure, your students can view from mobile if you don’t have any small print items to share, but I strongly recommend you encourage everyone to join your Zoom meeting from a desktop or laptop computer. Secondly, once you have a Zoom account set up, you can always go back to the web and sign in, or you can download a “desktop app” that lets you open and set up meetings from your computer. This is the easiest and fastest way to get going. I’ll cover both ways here.
Here are the steps to quickly set up your free Zoom account:
- To sign up for your own free account, visit zoom.us/signup and enter your email address. You will receive an email from Zoom (no-reply@zoom.us). In this email, click Activate Account.
- You can sign in to your Zoom account on the web at any time, at zoom.us/signin. Once you’re logged in, use the panel on the left side to navigate the Zoom web portal. You can update your profile, schedule a meeting, edit your settings, and more.
- To set up a meeting (even a practice meeting), sign in, browse to “Meetings” in the left panel. Then click on “Schedule a Meeting.” Choose Date and Time, and click Save.
- For practice, view your upcoming meetings listed in the Meetings tab of your Zoom desktop client or mobile app. You can click Start by the meeting name.
- For more formal testing, you can join a test Zoom meeting to familiarize yourself with the Zoom and test your microphone/speakers before joining a Zoom meeting. Visit zoom.us/test and click Join.
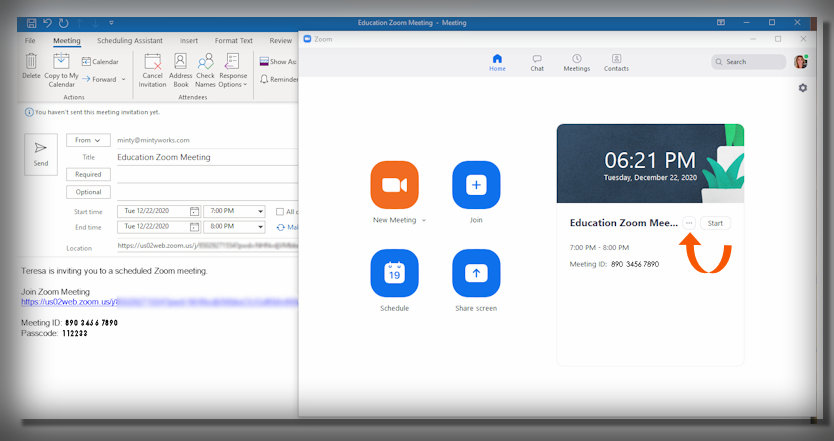
Alternatively, as I mentioned, you can set up meetings, join meetings, and control video settings from a desktop app. You can download the Zoom Desktop Client for Mac, Windows, ChromeOS and Linux, as well as the Zoom Mobile App for iOS and Android from the Zoom Downloads page (available after you log in on Zoom). Once downloaded, you will have a shortcut icon for Zoom. Click that, and you will see this window open:

Inviting others to join your meeting is as simple as sharing the invitation or join link. You can do this after scheduling your meeting by clicking Copy the Invitation. When you set up a meeting with your desktop app, an email will automatically be created, ready for you to add recipient addresses! If that isn’t available, click the three small dots in the “calendar” section of your Zoom home window (next to Start button). See both options in this image:

What Else Can I Do With Zoom?
Three great features of Zoom will give you great control over your class and presentations. These three are:
- The (moveable!) Chat Window
- Spotlight Actions
- Screen Sharing (by client window, full screen, and more)
Chat has its own controls! Move your mouse to the bottom of your Zoom window, and icons appear. Click the “chat bubble” as shown, then notice the extra options via the three “dots” menu at the bottom of the chat window itself, as shown:

More fun with Zoom: Click on the three dots of your own (or anyone else’s Zoom video). If you are the host, and there are at least THREE PEOPLE in the Zoom call, you will see the delightful Spotlight option. Click to Spotlight yourself for everyone, so that your image remains large, more or less filling the Zoom window. You can then also “Add Spotlight” so two or more are sharing the center stage of the Zoom window. And finally, you can “Replace Spotlight” to switch to feature someone else. Pretty cool!
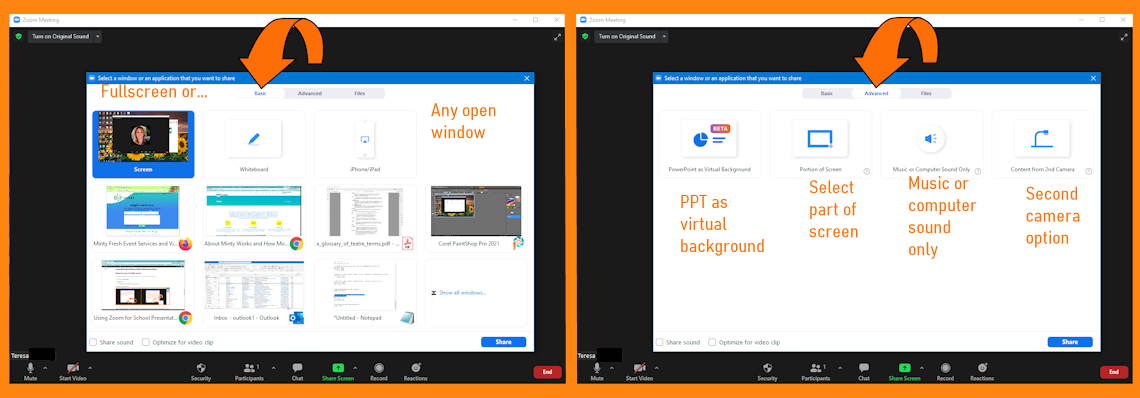
And finally, Screen Sharing. This is the very important tool used by teachers everywhere. Just like everything else, there are some advanced features for this button! See this image, and read the notes below.

As you can see above, the basic settings allow you to choose either full-screen to share with your attendees, or a window that you have open on your computer. Pretty neat stuff! Do remember to scroll down in case the window you are looking for is down lower on the page. In the advanced tab, you can select part of your screen, let’s say you have two important documents to share side by side. You can also try out the new “PowerPoint as a virtual background” feature. And finally, if you have another web cam feeding into your computer, aimed perhaps at a school project or art on the wall, this can be another feed into Zoom.
So there you have it! Hopefully this has provided you with a few of the most relevant tools for your presentations for education. There are many other useful features in Zoom, and I invite you to explore those, or give me a call with any questions. I’m here to help with your virtual events, as your “back office” event support team member.


